A behind-the-scenes timelapse of the whole shoot day. It shows all, or at least most, of the experiences I have mentioned in the post, and is a good overview of the day to start with.
I enjoyed the main workshop shoot day quite a lot. It was a completely new experience for me, and thus it was pretty scary at first, but I think I settled into acting and so on over the course of the training sessions, so the main day wasn't too bad, and I was able to have fun.
The main role I took was acting as one of the cool kids- the actors in the music video who weren't part of the band.
Here is an image of me in costume, getting ready to act in a group shot. There is a fellow cool kid to my left, so right of frame, also wearing their costume- the cool kid costumes consisted of casual clothing. On my other side is a band member, wearing their costume- the band costumes consisted of more formal clothing.
The shot we went on to do after the preparation seen in the above picture. As you can see, the order of people is the same, as we go from the back of the line, dance up the middle, and join back up at the front. We had been trained to give it our all yet perform naturally while doing this shot.
The majority of the work I did on the day was acting work- I went into hair and make-up, acted in group shots, acted in solo shots, and so on.
A photograph taken by a friend of me at the hair and make-up station.
I also helped out on the set when I wasn't acting- as I was just one of many cool kids, and not one of the band, I didn't have as much time on camera as some others, so I used this extra time to help out where needed.
I operated the clapperboard a few times- the director and main crew had a lot of important things to worry about, so me and the other actors taking over the process of writing in the shots and using the clapperboard helped them a lot, and ensured every shot was properly marked for editing later on.
A 'behind-the-scenes' screenshot from one of the takes where I was operating the clapperboard. I had to write in the shot number and take number and so on.
I also performed a couple of runner duties, such as helping move equipment and props like desks and chairs around, for example setting them up for certain shots and then getting them out of the way, as well as helping to get the food cart at lunch time so that the crew members and other staff could have something to eat.
Another picture of me acting- as I was in all of the shots requiring these desks and chairs, I helped get them out and set them up, as well as put them away afterwards.
In my downtime I also took a lot of photos of the goings-on of the set, as well as people acting and receiving hair and make-up work and so on, for use on this blog as well as those of my classmates.
Here I am during one of my breaks- I took the opportunity to sit down for a bit, and swapped to a long lens so that I could take some good shots of what was happening on set.
I think my best bit in terms of what I found the most fun was probably the solo acting. It was generally less intense than the dancing groups shots, which were fun, but made me a bit self-conscious at times, although I think I conquered this and I don't think it affected my performance. I thought the solo acting would be scarier since the focus is just on you, but thanks to the crew it felt like a casual chat or one of the acting exercises, but still provided a lot of good footage.
A profile shot of me during some solo acting work. The lighting was adjusted specifically for this shot, and I am performing a serious but fairly neutral expression.
Throughout this whole project I developed a few different skills and learnt a few different things.
From Task 1, the audition, I learnt some of the basics of a music video. I had to teach myself lip-syncing, and I edited in the style I was told to- no continuity, but lots of different angles and shot types and so on. I also had to perform physically, by doing movements and so on to go with what I was 'singing.' All of these things improved my understanding for the workshop shoot day, and doubtless will carry over into the main project.
My audition video, where I got the chance to effectively make a miniature music video and thus practice all the skills involved. This included filming, directing myself, performing, and later editing.
The rehearsals, Task 2, taught me a bit about the studio itself, as we got to see it being set up, and even had a practice in front of the camera while it was linked with the monitor. This of course helped on the shoot day, and will help in the future. However, the main benefit of the rehearsals was teaching us how to perform, and also, by observing Jasmine our 'acting coach,' how to direct as well. Seeing how she got different reactions out of us, as well as learning how to perform those reactions well, was useful to learn. The focus of Task 3, organising costume, was a smaller part of the project, but an essential one. I learnt about the costume design and compiling process- making compromises and having as many options as possible are the golden rules when trying to use what you have to achieve the right look and thus persona for each character, and these rules will doubtless help in the main project.
An image of me in my full costume. The cool kid I was playing originally has an orange and white number jersey, but after looking through many options we compromised on this one as it is incredibly similar, and only missing the orange. The rest of the outfit, namely trousers and shoes, is pretty much identical.
The final task, Task 5, was the edit, and it was probably the most daunting task barring the shoot itself. We effectively threw all previously learnt rules out of the window, such as continuity and shot progression, and furthermore we had to follow the real video as closely as possible and ensure the lip-syncing looked right. Deconstructing and reconstructing the video was useful for seeing some of the conventions of music videos, such as jumping between scenes and close-ups on lip-syncing, and while in the main project we won't have to follow a video, it will all be original, spending time finding the perfect moment from a take and cutting it and otherwise editing it to be near perfect is definitely something to carry forward into the main project.
A ten-second .gif showing some of the things we learnt about music videos, such as no continuity, quick shots and jumps between multiple scenes, 'beauty shot' close-ups of important characters such as the singers and the band, and more.
A picture of me while I am editing my and Sayo's version of the music video remake, in Premiere on one of the edit suites. Editing involved both placing shots correctly as well as grading.
Our finished music video remake edit. For optimal viewing select the best HD quality you can support and use fullscreen.
I am quite pleased with the footage and our finished edit. The footage, overall, is great. The crew did multiple takes, and they are all quite long, and this means most of the time the exact action that appears in the real video is present in our footage. However, some of the footage isn't framed correctly, and so had to be reframed using Premiere, and some of the footage doesn't have the correct lighting. While overall the lighting was great, and really made everyone look good, in the real video the background for different shots was different colours at different times, and the lighting often dims or brightens over the course of one shot. This was harder to do in Premiere, and would have been better to do while shooting. In the end though, the footage is definitely better looking than I expected- since so many of the movements are meant to be natural, I was surprised at how many of them we were able to copy, and this makes up for any small problems.
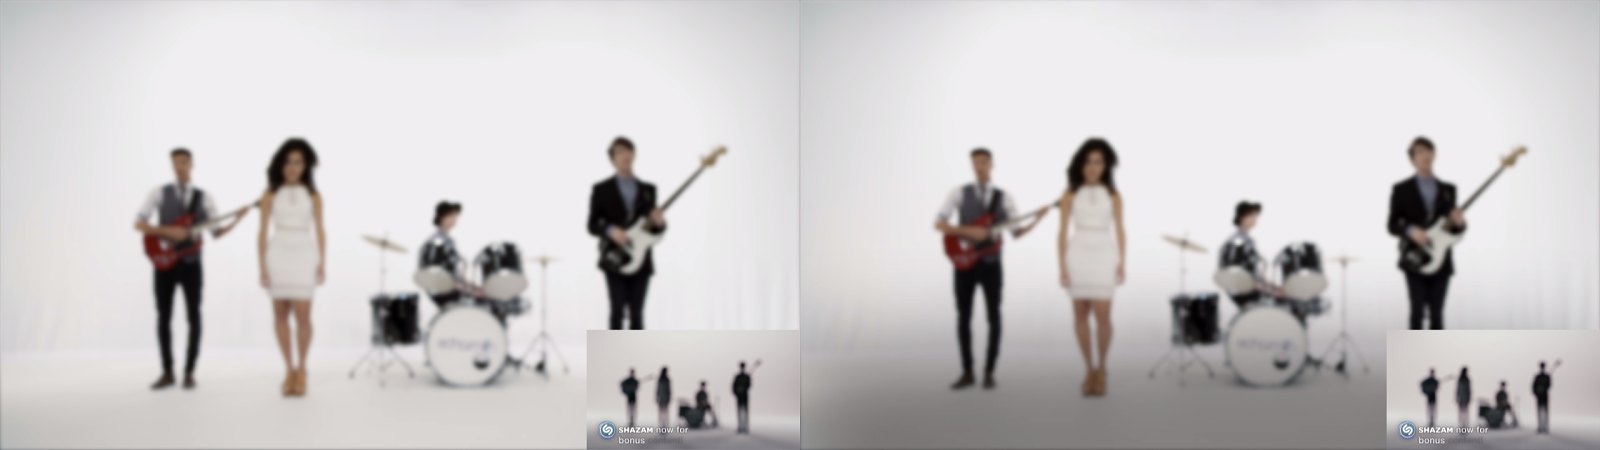
A ten-second .gif showing the fairly high accuracy of the footage we chose for our final edit- as you can see, the character and shot movements, as well as the framing and other editing, are quite similar to the real video seen in the bottom right-hand corner.
The edit looks quite good too. The lip-syncing and shot times are matched up pretty much perfectly, and the grading looks pretty good too, even if it isn't wholly accurate sometimes. Inventive grading did end up fixing a couple of the problems with the footage, such as pink and yellow tints, as well as grey backgrounds. Premiere's movement tools really helped with shot positioning, and a lot of the shots are practically identical to the real video because of this. It ended up looking very close to the real video, which is better than I expected, as I thought we would need more compromise.
Another ten-second .gif, this time showing how the editing and grading contributed to the accuracy of the video. Shots are tinted, for example, yellow and grey where needed, and various flashes have been inserted to match the ones in the real video.
I would say that the recolouration of certain shots is actually both what works well and what I would change. This is because when it works well, it works really well, but when it doesn't work, it looks somewhat strange. Given another chance and more time I would spend a lot more time tweaking the grading and so on to achieve the correct and desired effects, and I would also cut my losses a bit more than I actually did- we decided not to recolour some shots as with the recolouring they looked strange, and this compromise raised the quality of the video as a whole despite losing some similarity, but I think a few shots we did recolour should maybe also have been left plain.
The first shot of the finished video, and an example of good recolouration- original with grading on the left, and the recoloured version on the right. The grey fade we added to the bottom of the shot makes it look a lot more similar to the real shot, and doesn't negatively impact overall grading or visuals in any other way.
A shot from around one minute twenty seconds of the finished video, and an example of unsuccessful recolouration- original with grading on the left, and the recoloured version on the right. This time, while the grey fade makes the background look more similar, it makes the grading not look as good, and there is a noticeable change in colour across the singer's legs and the drum kit. We probably would have had better results by scrapping the recolour and focusing on fine-tuning the grading some more.
In terms of pre-production, I think my prelim experiences will really help me with my approach to the music video coursework, especially the pre-production of the video itself. While I didn't have a huge hand in it myself, I watched and learnt from the staff and crew as they organised characters, costumes, the studio and so on. It seems like a large job, and it took place over quite a long time, so I will be sure not to underestimate it in terms of the time or manpower needed when the time comes for me to do it. For production itself, I think the experience I have gained from the prelim will help with the coursework. Again, it is a large job, with a very strenuous day of filming needed even with all the staff- there are a lot of different roles, and all of them need training. The crew, for example, were mostly professionals, and we underwent a week of practice in order to be considered good enough actors. When it comes to the production of my video, I will have to work with my group to make sure everyone is well-trained for the role they take- whether that means allocating roles based on how good each media student in the group is at camera work, acting, etc. or even recruiting and training up non-media students to fill any essential but vacant roles.
The schedule for the shoot day. It represents all the planning of pre-production and production, and commits to paper the organisation of staff, both crew and actors, with a strict schedule, with an equipment list and more.
Post-production prelim experience will likely help with editing my video, but also with analysis and so on throughout the coursework. Deconstructing and reconstructing the video in the way that we did, which mostly took place during post-production, has given me a decent idea of what actually makes a music video. This knowledge, plus the practical knowledge of how to edit to achieve the music video look, should serve me well during the entire course.