My finished music video:

My front digipak panel:

My front digipak panel:
Right-click the image and open it in a new tab for a bigger version.

My inside digipak panels:

My inside digipak panels:
Right-click the image and open it in a new tab for a bigger version.

My back digipak panel (with album spine:)

My back digipak panel (with album spine:)
Right-click the image and open it in a new tab for a bigger version.

Click the image below to open my website in a new tab:

Thursday 2 February 2017

R+P Post 12: Our Storyboard

After the timeline, we decided to create a storyboard. Although the timeline mapped out our opening in a clear way for the first time, we wanted a detailed, visual guide to each shot in order, as even with diagrams the text-based format of the timeline wouldn't really cut it going forwards, for example when the time came to create a shootboard and so on. We thus decided on a storyboard- it would allow us to see how each shot worked individually as well as together.
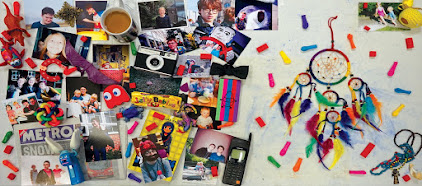
This is a shot of the whole storyboard. As with the timeline, closer, easier-to-read pictures will be provided where relevant, but hopefully this wide picture shows you how every shot has been planned out to work together yet are also robust and detailed on their own. You can also see the colour key, explained later, in action, one of the ways we made information available at a glance. Click to enlarge.
To start, we created a key for the sticky-notes we would be using. This would ensure we could take one look at the shot and, simply from the colour, know what the framing should be. This, combined with the simple style of illustration, meant that it would be incredibly easy for us to get information from the storyboard quickly and visually.
A closer shot of the storyboard key, along with some of the shots. Hopefully from the illustrations you can see how the colour of the stickynotes matches the key, and how easy it is to get information such as basic framing from the storyboard. Here you can even see how we integrated overlaying titles into our storyboard. We knew at this point that we were going to use them, so including that information in the storyboard's simple visual layout was quite beneficial. Click to enlarge.
Then, we started turning the fairly brief shot ideas on our timeline into more detailed stickynotes for our storyboard, combining all three tracks into one. This meant the actual visual component of the shot, as well as basic dialogue, special camera movements and so on, were all available by just looking at the shot. This was very useful for us- it helped avoid the confusion of swapping characters by showing us each character's intial, as well as how each shot naturally flowed into the next, through dialogue creating a conversation as well as shot reverse shot. This meant we should, if all went well, never get confused again.
An extract from around the middle of our storyboard. You should be able to see the variety of shot types, as well as how we have illustrated zooming the camera in one of the shots. Some dialogue forming part of the conversation can be seen, as can swapping between characters- look at the initials. Click to enlarge.
When we finished, we had learnt that we needed to be careful about how each shot moved into the next so as not to be too confusing, because of our unique situation with the high amount of characters changing places. We also realised we didn't have to change anything at this point, as we had succeeded in creating a quick visual guide, although we acknowledged we may have to change things in the future, which is why we chose the medium of stickynotes that can easily be moved around and changed.

No comments:

Post a Comment